


Graphing General Polynomials, Radicals, Rationals, and Piecewise Functions
Purplemath
You will probably spend quite a while studying linear functions and their straight-line graphs, and quadratic functions and their parabola graphs. But most functions are of other types, and their graphs often involve different, or at least additional, issues in order to complete the graphs clearly and correctly. What follows is a quick overview of some of the more common types of functions.

(Elsewhere on Purplemath are lessons for graphing exponential and logarithmic functions.)
How do you graph general polynomials?
For graphing polynomials with degrees greater than two (that is, polynomials other than linears or quadratics), start by plotting plenty of points. The best points to start with are the x- and y-intercepts. To find these, we use all the factoring tools that we have. (They'll almost always give you stuff that can factor, so that you'll be able to find the x-intercepts.)
Once the x-intercepts are found, we should pick some x-values between the x-intercepts (if there's a reasonable amount of room between them), and also one or two points to either side of the intercepts. This gives us a nice list of points to plot.
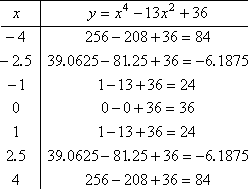
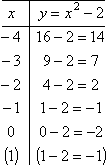
If we also keep in mind the end-behavior of polynomials, then these graphs can actually be pretty simple. For example, let y = x4 − 13x2 + 6. This polynomial is a positive even power (in particular, it's of degree four), so the graph will go up on both ends (like the quadratic on the previous page). Factoring the polynomial, we get:
y = (x + 3)(x − 3)(x + 2)(x − 2)
So the zeroes (that is, the x-intercepts) are at:
x = −3, −2, 2, 3
If we plot a few other points on our T-chart, it will be no trouble to do the graph. Because the pairs of x-intercepts are so close, I'll go to the trouble of evaluating the polynomial at the halfway points between the zeroes; that is, at x = −2.5 and at x = 2.5. This polynomial is a fourth power, so it likely grows quickly. So I'll do one point below and another above the zeroes. Not including the x-intercepts, my T-chart looks like this:
T-chart
Graph (note scale on vertical axis!)
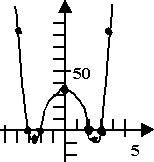
Why did I shrink down the vertical axis' scale? Because otherwise my graph would have been ridiculously tall. This graph is an example of why axis scales should be labelled, and why you should pay attention for them — or, if the scales are missing, you should wonder what is being hidden from view, and why.
(If you would like to study this topic at greater length, please see Graphing Polynomial Functions.)
How do you graph rational functions?
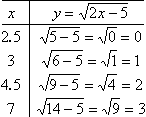
The most important thing to remember graphing radicals is that, if you're dealing with a square root (or a fourth root, or any other even-index root), you cannot have a negative inside the radical. Since this is true, it is entirely possible — even likely — that there will be values of x that are not allowed inside the function.
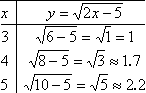
For instance, if they give us , then we know that 2x − 5 must not be negative. Algebraically, this means that we must have:
2x − 5 ≥ 0
Solving this inequality gives us the domain for the function:
2x − 5 ≥ 0
2x ≥ 5
x ≥ 5/2 = 2.5
This tells us that x cannot be less than 2.5 so, for heaven's sake, let's not try to plot points that aren't even allowed. In other words, despite the instinct always to start by plugging in x = 0, we shouldn't bother for this graph.
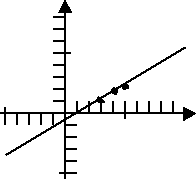
Square-root functions are usually the first time that students encounter a graph for which there are "no go" areas. As a result, they often forget that the graph simply can not exist in certain parts of the plane. The following is what often happens if the student is careless in this regard:
Barely Adequate T-chart
Why is the above T-chart "barely adequate"? Because it has three points plotted, but they're too close together, and the dots will necessarily be estimates from the decimal approxomations. This is not good enough for a square-root graph, in large part because it leads the beginning student to do the following:
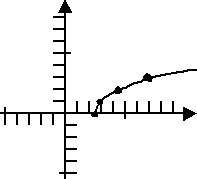
Incorrect Graph
By not paying attention to the domain and by not spreading out the x-values, the student was fooled into thinking that this function graphed as a straight line. Instead, we want to pay better attention to the restriction on the domain, spread out the plot points better, and maybe even try to get "nice" points to plot.
Better T-chart
By picking better x-values, this T-chart will give a more representative set of dots (especially by highlighting the definite curve near the left-hand end of the domain), and will help me draw the graph correctly.
Correct Graph
(If you would like to study this topic further, please see Graphing Radical Functions.)

How do you graph rational functions?
Rational functions are polynomial fractions; in particular, there will be a polynomial of some sort in the denominator. So, when you factor the denominator (if needed), keep track of the disallowed values (that would otherwise force division by zero).
Before we even start the T-chart for a rational function, we first have to check the denominator for any vertical asymptotes. It will also, as usual, be helpful to find the intercepts. Once we have successfully done that, we can then choose x-values between the x-intercepts and the vertical asymptotes, to give us the additional information necessary to graph the function.
As bad as these functions look, they can actually be quite easy to graph, especially if we've taken the time to lay the groundwork. For instance, suppose they gave us the following:
From what we've learned about rational functions, we know that the vertical asymptotes are at the zeroes of the denominator. In this case, we get:
x2 − 4 = 0
(x − 2)(x + 2) = 0
x = −2, 2
The degree of the numerator matches the degree of the denominator, so the horizontal asymptote is the result of dividing the numerator's leading term (in this case, 2) and the denominator's leading term (in this case, 1). So the graph, off to the sides, will be very close to y = 2.
The x-intercepts will be at the zeroes of the numerator, which will be x = −3, 3. The y-intercept occurs when x = 0, which gives us y = 9/2 = 4.5.
Now I'll plot a few additional points between and to the far sides of the above points:
T-chart
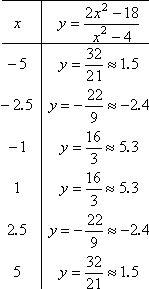
It's hard to get "nice" plot points for rational functions. So I'll do the best I can with what I've got, and be glad that the intercepts and asymptotes provide such a helpful guide.
Graph
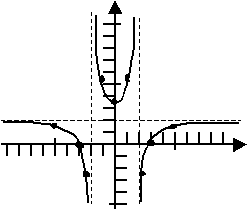
How did I know which way to go (up or down) at the vertical asymptotes? You can figure this out by looking at the x-intercepts we had. We can only cross the x-axis at an intercept; therefore, if there is no intercept, then there is no crossing of the axis. So, on the left, I knew the graph traced along the horizontal asymptote, came down to cross the axis at x = −3, and then stayed down below the axis, because there was no place (before the vertical asymptote) for the graph to cross the axis to get back above the axis. In the middle of the graph, between the two vertical asymptotes, there were no x-intercepts, but there were points above the x-axis, so the graph always had to stay above the axis. On the right, the graph mirrored what happened on the left. (This is not always the case.)
Note: Occasionally a graph just touches the x-axis at an intercept, instead of going though the axis. That's why I checked points between the x-intercepts and the vertical asymptotes.
So the asymptotes and intercepts gave me general regions where "stuff" was going on. The horizontal asymptote was just a "suggestion" for the general behavior of the graph when it heads off to either side; it means next to nothing in the "middle" near the intercepts, ao I was quite welcome to cross it in near the intercepts. By plotting a few additional points, I was able to nail down specifically what was happening in each region. The above is the kind of graph that your instructor will be looking for.
(If you would like to study this topic further, please see Graphing Rational Functions.)
How do you graph piecewise functions?
Piecewise functions are defined in terms of pieces of the x-axis; there will be difference rules for what x does on each of the various pieces of the graph. Because of this, we have to graph them in pieces, too. For instance, suppose they gave us the following:
Since this functions has two pieces (that is, it has one rule for x-values before x = 1 and another rule for after this point), it can be helpful to do two T-charts, one for each piece. (If a piecewise function has more pieces, we can always do more T-charts.) The break between the two pieces of the function (that is, the point at which the function changes rules) is at x = 1, so this value is where the T-charts will break. The procedure looks like this:
T-chart 1 (for the x < 1 part)
T-chart 2 (for the x ≥ 1 part)
You may have noticed that I plotted a value for x = 1 on T-chart 1, even though this x-value isn't allowed for the function's first rule. I did this so that I'll know where the line would have been going, had it continued all the way to this breakpoint.
In my graph, I'll draw an open circle, rather than a regular dot, at x = 1 to indicate that I know that this point is not actually included in the first part of the graph. This technique (of finding what the point would have been) is most helpful when the rules for the pieces of a function are complicated and curvy.
Graph
The open circle indicates that the first piece of the graph is everything up to, but not including, that point. This notation can be especially important when, as in this case, the pieces of the function don't join up at the ends.
© 2024 Purplemath, Inc. All right reserved. Web Design by ![]()